Receiving Inventory
This application lets you enter new receipts and check open receipts (pre-receipts).
Use the filters on the left-hand side to limit the table as needed. When you are finished with the filters, click the arrow between the filters and the table to hide them.
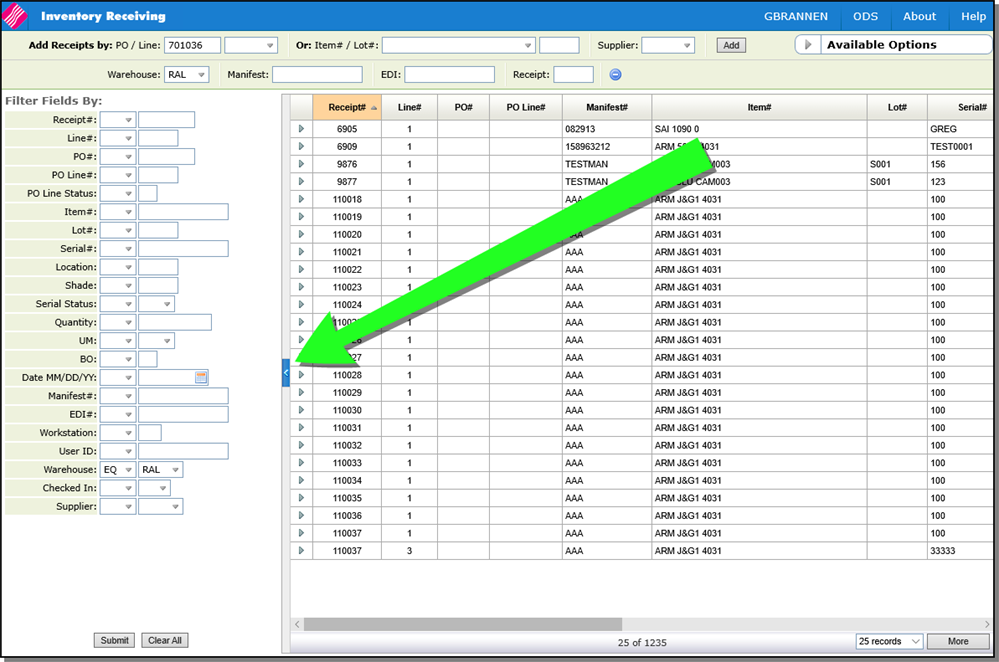
The filter Checked In is for Integrated Warehouse Management System (IWMS) users. Within IWMS, a code of CI is automatically assigned when a receipt is checked in and then putaway with a RF gun. You can use this filter to limit the display to only show receipts that have been check in.
- Enter either a purchase order and line number or item and lot number. Depending on your Warehouse Settings (SET 14) you might be required to enter a manifest.
- If you enter a Purchase Order number, you can use the drop down arrow to select the line number.

- Enter the warehouse, manifest number, and receipt as needed.
- Click Add. The screen expands to allow you to enter more information.
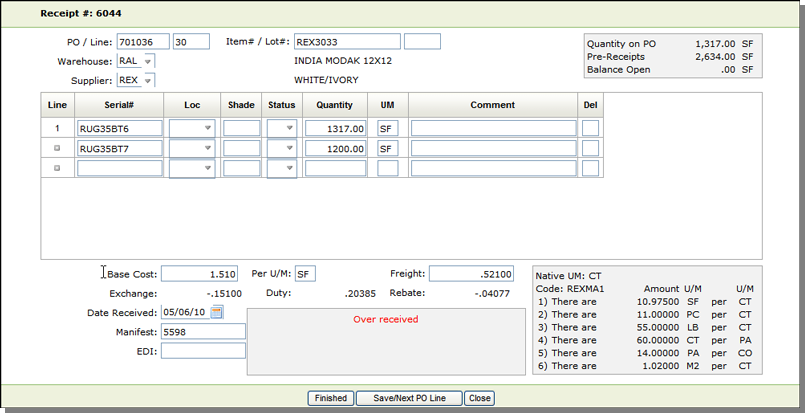
- Use this screen to enter the serial number, quantity received, and other needed information.
-
To delete a line, simply enter a D in the Del box and click Save or Save and Next.
- Notice the warning message Over Received. This means that the quantity received exceeds the quantity open on the purchase order. The warning message does not prevent the receiving entry from being made.
- The + icon allows you to duplicate the information from the previous line and then make changes as needed.
-
The packaging information comes from the Packaging File.
-
Click:
-
Finish to save the receipt and return to the first screen.
-
Save/Next PO Line to save the receipt and go to the next PO line.
-
Close to return to the first window without saving the receipt.
-
| Field | Description/Instructions |
|---|---|
| Base cost |
When a purchase order is entered, the most applicable standard base cost is selected from the Cost File (if cost classes are used) or the Item File (if cost classes are not used). When a receipt is entered, and a purchase order number is specified, the base cost as entered on the purchase order is used, regardless of the current base cost in the Cost or Item file. The receipts entry program also allows the *SC code to be keyed in the EDI# Field, instructing the program to use the standard cost from the Cost or Item Files instead of the cost of the purchase order. |
| Freight |
Freight costs are the freight and handling portion of total landed cost. Freight cost should be zero only when goods are purchased on a freight prepaid basis. Methods of applying freight are:
Some notes about Freight Costs
|
| Exchange | The Exchange field displays the conversion difference between two currencies. This difference can either be added to or subtracted from your cost. Currency conversions are set up in the Exchange Rate Table (SET 11). This file enables you to define codes representing each currency, and the respective exchange rates. These exchange rates can be used automatically within the Receiving System for foreign suppliers that are coded for this feature. |
| Duty | Duty rates can be automatically applied within the Receiving System. This option is used only for foreign suppliers that are coded for this feature. The Duty table can assign a duty percentage to a manufacturer, supplier and product lines. The Duty Table is only accessed by the receiving program if activated on your system through the Warehouse Settings Table (SET 14). |
| Rebate |
The Rebate field works in conjunction with the Expected Supplier Rebates Table (SET 10) to determine if the inventory should be marked up or down. The Supplier Rebates Table and the Rebate field share the following relationships:
|
| EDI |
The EDI field has two uses.
Kerridge can set it up where standard costs are always used in place of purÂchase order costs. This option should only be considered for importers and manufacturers. |
Splitting Lines
This option is designed to work with items that use PA (pallet) as their UM or items that have a pallet UM in their packaging class within the Packaging File.
Consider receipt 4198 which only has 1 line.

By clicking the arrow to the left of the receipt number and selecting Update, we can see that the receipt line is for 126 CTs (cartons). Notice that the item also has a conversion from cartons to pallets in the package information.
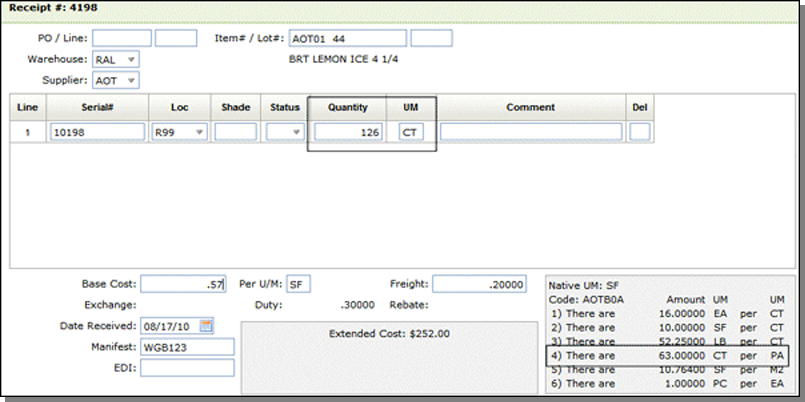
To split this receipt into two lines, click the option arrow to the left of the receipt and select Split. Enter the receipt number and the line you want to split.
Going back to the Inquiry screen and searching for receipt number 4190 now shows that the receipt has two lines.

Receiving Rugs
When a rug item is received or manually selected, the following fields are displayed:
- Length
- Width
- Price
- Pieces
- Access Navigator Inventory Receiving.
- At a minimum, enter the PO/line, Item# and Manifest number.
- Click Add to expand the window. The new fields are circled below.
- Notice also the new Serial Item View button at the bottom of the window.
- Clicking Serial Item View replaces the Length, Width, Price and Pieces settings with Quantity and UM settings.
- The button title also changes to Price/Dimension View.
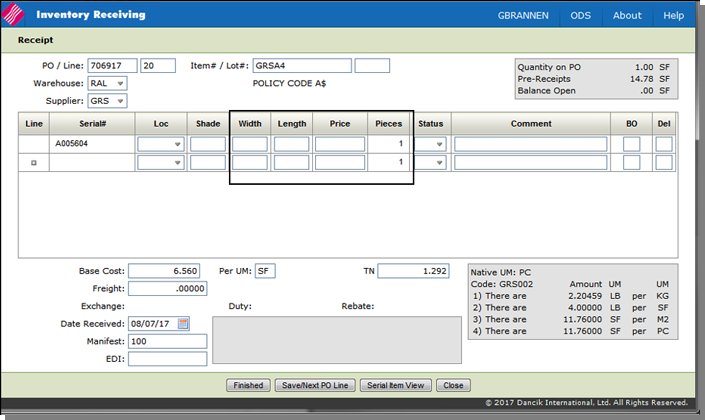
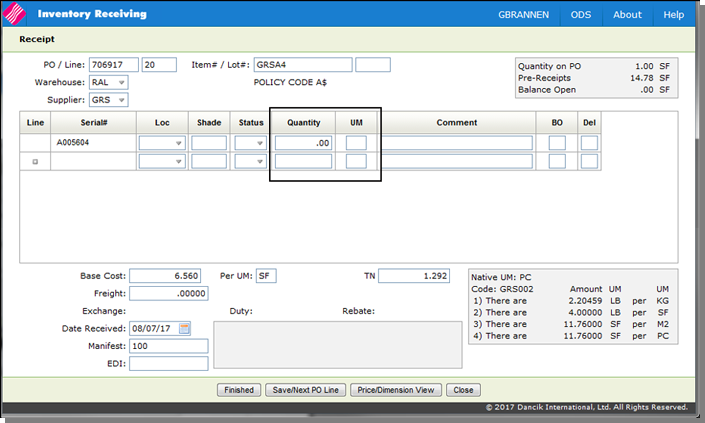
The screen shown above is the traditional Inventory Receiving screen.
Click Price/Dimension View to return to the Rug specific view.
